Last updated February 19th, 2025 by Kenneth Ojeisekhoba
OXERBLOG > BLOG > HOW TO START A BLOG AND MAKE MONEY IN NIGERIA
Disclosure: Oxerblog depends on its readers’support through referral links. I may earn a small commission for some of these links, at no additional cost to you.

This is the most detailed article on how to start a blog and how to monetize it in Nigeria in 2025.
This post is for individuals who want to start a blog to cultivate a career and business in blogging in Nigeria and become their own boss.
I have written it in great detail so you can use it as a blueprint to start your blog and make good money from it.
In this guide, you’ll learn:
✓ How to create a blog that can go live in mere minutes
✓ How to optimize your content so it can rank high on Google
✓ How to earn money from your blog
✓ How to promote your blog to attract the right people
✓ And much more
Why Is Starting a Blog in Nigeria Worth It Today?
Blogging has opened up numerous career paths and business opportunities for thousands of people in Nigeria today, just as it has in other parts of the world.
So many people, young and old, now work as full-time bloggers and earn their livelihoods from their blogs.
The beauty of blogging is that you can create a blog on any topic and generate income if people are interested.
No niche is ever too saturated. If you offer a fresh perspective that helps people better understand the topic, you can make money from your blog.
The opportunities are limitless, and there is no cap on how much (and how long) you can earn, so long as your content remains relevant and helpful.
What’s more, you can create your blog on a tight budget and start making money in no time if you set it up well.
Best of all, in Nigeria today, you can build a career and a business as a blogger while you have complete control over your time.
Note: Blogging is not a get-rich-quick scheme or an overnight success. You’ll need to put in hard work and effort to succeed as a blogger.
With that, below is a list of the contents we will cover in this article:
Table of Contents
▪ Choose a Niche Where You Can Get the Best Results
▪ The Basic Requirements Needed to Start Your Blog
9 Steps To start A Blog that Makes Money in Nigeria
▸ 1. Select a Hosting Plan and Register Your Domain Name
▸ 2. Install WordPress as Your Blogging Platform
▸ 3. Choose a Simple, Mobile-Optimized WordPress Theme
▸ 4. Create Solid, Useful, and Relevant Blog Posts
▸ 5. Create the Critical Pages Your Blog Needs
▸ 6. Optimize Your Blog Posts for Higher Rankings
▸ 7. Install Plugins to Add Must-Have Features
▸ 8. Add Money-Making Opportunities to Your Blog
▸ 9. Promote Your Blog to Your Target Audience
▪ Frequently Asked Questions (FAQs)
Now, let’s set the ball rolling.
▪ Choose a Niche (or Topic) Where You Can Get the Best Results

Identifying your niche is the starting point for building a successful blog.
A good blog niche is to a blogger what the starting blocks are to an athlete.

To kickstart a successful blogging career, selecting the right niche is crucial.
On the other hand, you will only struggle if you’re in the wrong niche.
A blog niche is a specialized area on the Internet with its audience, needs, products, and opportunities that align with your skillsets and interests. It is this area you want to focus on in your blog for the long term.
Now, Google has divided blog topics into two broad groups.
According to them, the first group comprises highly sensitive topics, such as health, safety, finance, law, tax, etc. requiring relevant formal expertise. Google refers to them as Your Money or Your Life (YMYL) topics.
The second group is for less sensitive niches, such as humor, gossip, food, fashion, etc.
You can be considered an expert in these areas if you have daily experience and sufficient knowledge about the topic. Google refers to these blog topics as Non-YMYL niches.
That said, you don’t just want a niche where you can get some results.
From the beginning, it is important to select the ideal niche where you can produce the best results.
Now, getting the best results requires that you give your all, and you are committed to doing so for many years to come.
So, whether you’ll be able to pursue your career path and establish a successful blogging business will depend largely on the niche you choose.
You must fit the niche, and the niche must fit you.
There are 5 factors to consider when determining the feasibility of a niche before starting a blog about it.

You don’t want to choose a niche topic unless it has enough of these 5 elements.
You can easily determine if a niche possesses a strong combination of these 5 elements by conducting a simple research I have named the Enough Niche Test.
You should put every topic you’re interested in through the Enough Niche Test to determine if they have enough of these 5 factors before committing to the one you think is perfect for you.
Let’s take a look at them one by one.
1. Enough people/problems
Are there enough people to help and enough problems to solve in the niche?
This is the first parameter for determining a lucrative blog niche.
A niche will only be worth pursuing if there is a sizable audience interested in the topic, and a number of issues you can assist them with.
To find out, simply input a keyword related to the niche into a research tool like Google Keyword Planner, KWFinder, AnswerThePublic, Semrush Keyword Overview, or Ubersuggest.

This will give you an overview of the average monthly search volume for that keyword.
For example, if you want to start a blog on Consulting in Nigeria, below is the search volume, according to AnswerThePublic:

You can also use a free tool like Google Trends to check people’s interest over time in the topic.
Enter the niche you want to check into the search field, and it will show you a graph of the search interest globally or for a particular region, over a period of time – from the past hour to one decade ago.
For instance, if you check the web search for Consulting services in Nigeria over the past 12 months, the data indicates a consistent level of interest.

Google Trends also publishes interest by subregions and a list of related topics you may want to check out.

Do the same research for other popular keywords in the niche.
You want to target evergreen keywords, which are consistently searched all year round.
All of these statistics are 100% accurate and trustworthy because Google Trends is owned by Google.
They are the exact data on what users are typing into their search engine.
And Google has the majority of the search engine market share everywhere, including Nigeria (Statcounter).
2. Enough expertise
Ask yourself the following questions about your expertise:
Am I well-equipped for the blog topic? Do I know enough to address the problems I have identified in the niche?
Do I need formal expertise or first-hand experience to solve these problems? Do the problems require specific data or just my expertise/experience?
Do I have any new or unique ideas to contribute to the topic? Do I need to learn more about the solutions to these problems? Am I ready to gain more knowledge about this subject?
In Google’s Search Quality Evaluator Guidelines, expertise and first-hand experience are crucial factors used to evaluate the quality of an article or website.
Again, sensitive topics require formal expertise, while less sensitive niches require first-hand experience (or what Google calls ‘everyday expertise’).
Every website (and page) needs enough and appropriate expertise to be authoritative and trustworthy on the subject, according to Google.
So, whether it is an informal topic or a sensitive niche, you need the requisite expertise to stand a chance of success.
3. Enough passion
Am I enthusiastic enough to want to create a blog about the topic? Will I continue to be passionate about the topic for years to come?
Can I stay motivated to create content about it for a long time? Is it a topic I’ll want to continue to learn about?
Because if you pick a niche you won’t be in for the long haul, you’ll run out of steam.
The initial spark is good and important, but it must be the perfect niche, to keep the fire burning.
4. Enough sustainability
Is it a flash-in-the-pan topic, or will it still be relevant for many years? Can I build a career and a sustainable business in the niche?
Will there always be fresh topics in the niche to write about in the future? Do people search for the blog topic all year round or seasonally?
Will they still be interested in the niche in the distant future?
You can only continue to attract a sizeable audience and earn a passive income if the topic attracts a sizeable readership year-round, and will continue to do so 10 to 20 years down the line.
5. Enough profitability
What are monetization opportunities in the niche? Are there enough prospects to make money in the niche?
How many streams of income can you use at once? What are the income projections for the niche?
For example, if you want to monetize your blog through affiliate marketing, you want to first research whether there are enough related products that you can promote to your audience.
While money shouldn’t be the main motivation to choose a niche, it is an important factor you cannot neglect if you’re starting a blogging business.
The answers to these 5 critical questions will reveal whether the niche is where you can get the best results.
If you check all the five questions, that is your perfect niche right there. The chances for success in that niche are excellent.
That’s what you want to start blogging about.
If you have a situation where 2 or 3 blog topic ideas pass the Enough Niche Test, choose the one you feel is most likely to produce the best results.
You need to know that any niche you choose will shape your blog’s future – and by extension, your blogging career and business.
Again, you should see my very detailed post on how to choose your perfect niche.
It includes 273 popular blog niche ideas, to help make your search easy.
Once you settle the issue of your niche, you can kick-start the building process of your blog.
The Basic Start-Up Tools Required to Set Up Your Blog
When you’re just starting out, it is best to invest in a few budget-friendly tools to build a robust and user-friendly website.
Regardless of your chosen niche, the essential tools needed to create a blog are the same worldwide. These tools include:
▪ A domain name
▪ A web hosting account
▪ A blogging platform
Domain name

A domain name is an essential requirement for starting a blog.
A domain name is a word or combination of words by which your new blog will be known and accessed on the internet. E.g. oxerblog.com.
A domain name comprises the site name −”oxerblog”, and the extension − “.com”.
Some domain names include numbers, although I discourage this. Because searchers usually forget to add them.
And when they do, they land on your competitor’s site.
A domain name doubles as the name and the address of your blog.
Next, your domain name should be unique.
So, when someone from any region of the world enters it into their browser, they are taken to your blog and no one else’s.
Unlike human beings who can bear the same full names, and it will be acceptable, it is not allowed on the web for two sites to have the same exact domain name and extension.
However, having a unique name isn’t enough. If your domain name is not easy to spell or is too long to type, visitors will abandon your site.
If it is also difficult to remember, the probability of them returning after the first visit is slim.
If it is also hard to pronounce, it will be difficult to share verbally with others.
So, the perfect domain name is unique, short, easy to spell and type, memorable, easy to pronounce and share.
Very importantly too, domain ending is somewhat a ranking factor.
Once you use a country-code top-level domain (ccTLD) like “.ng” or “.com.ng”, it automatically says to visitors and search engines that your content is meant for that country.
This can limit your site’s rankings in global search results.
That’s why I recommend you use a general top-level domain (gTLD), preferably the “.com” extension. Because it is the most popular globally.
People simply assume that all domain names end with “.com”, and so, instinctively type it at the end of every name.
So, when choosing a domain name for your blog, think globally even if you have a local focus (unless your content is targeted at that region).
Having said all that, a good domain name won’t just fall into your lap.
Because millions of bloggers and domain name speculators are scrambling for the same premium names.
But with some creativity and ingenuity, you can coin a unique and brandable name that will just be perfect for your blog.
In some cases, you may need to combine two or more words creatively to form a portmanteau word.
Again, avoid numbers and characters like hyphens, colons, underscores, etc. in your domain name.
I have written an exhaustive article to help you through the process of selecting a good domain name for your blog.
The 18 tips and tools in the guide are very practicable and easy to understand.
Once you find a name you really like and is available, you want to register it quickly before someone else takes it.
It costs between $5 and $15 (i.e. about ₦5,000 to ₦15,000) to register a name with one of the popular extensions like .com, .org, .net, etc. for one year.
Note: I have pegged the exchange rate at ₦1,000 to the dollar for this article. Due to the declining value of the naira, it may be much higher than that.
Domain names with new extensions usually cost more.
You can register your domain name with a domain name registrar. Please choose a trusted and reliable one because hundreds of thousands of domain names get hijacked every year.
However, if you’re starting your blog now, most web hosts will allow you to register your domain for free for the first year once you purchase a hosting plan.
So, just hold on, I’ll take you through the process in this guide. You can then save that money for something else.
Note: You’ll have to renew your domain name every year if you want to continue to use it. And you can use it for as long as you want.
However, if you’re yet to find a domain you’re comfortable with, you can still create your blog on Bluehost.
They have an option that allows you to choose your domain later.

I’ll show you how in this guide.
Web hosting

Web hosting is the home you rent for your new blog on the web.
While you can get free hosting for your blog, I do not recommend it.
Because any free hosting arrangement always has a catch.
You’ll build and host your blog for free, but you won’t have any control whatsoever over it.
Instead, your blog will be in the shadow and control of your free hosting provider.
For instance, your blog’s name will be a subdomain of your hosting provider – www.yourdomainname.yourhostprovider’sname.com. E.g. www.yourname.wordpress.com.
This makes your domain name too long, which is not user-friendly. It also does not show professionalism.
On top of this, free hosting providers place all kinds of limitations on their users.
First, you can’t use any paid tool such as premium themes or plugins that you may need on your blog.
Second, you cannot upload audio and video content on your site, should you want to include any.
Third, you are given very little space for your content. So you can’t create enough content for your readers.
Fourth, you cannot make money through every channel on a free site. For example, you cannot sell products or earn with display ads.
Meanwhile, WordPress.com will display ads on your site and pocket all the profits. And the list goes on.
So frankly, free hosting isn’t a good idea if you want to make a career out of blogging.
The best option is to make an initial investment in premium hosting, where you’re fully in charge.
The cost is so insignificant compared to the benefits – about $3 (i.e. about ₦3,000) a month.
With paid hosting, you get all what you can’t get from free hosting, and more.
The best part is that all the money you make from your blog is yours.
If, for example, you make $1,000 (i.e. about ₦1 million) monthly, it is all yours. Some bloggers make a lot more than that every month.
What’s more, there are many ways to generate income with your blog when you buy a web hosting plan (I’ll show you later in this guide).
Having said all that, you want to be careful where you rent a home for your blog.
Many web hosts are not very reliable. They switch on and off just like NEPA. And when they’re available, they’re pretty slow.
This can badly affect your rankings, traffic, and income.
So, you want to carefully choose a reliable and trusted web host that can guarantee at least 100% annual uptime rates and has a proven track record.
It should also be a hosting company whose servers respond quickly to search queries.
Thankfully, there are several web hosting providers that are both responsive and affordable.
Again, one of my favorite hosting companies for beginners is Bluehost.

They have an amazing track record of launching and hosting new blogs successfully.
Currently, more than 2 million blogs and websites are renting various spaces on their platform – from Shared hosting to Managed hosting.
They’ve been offering hosting services for about two decades.
Their Basic Shared hosting plan is awesome for a new blog. It costs $2.95 (i.e. about ₦3,000) a month, for the 1-year plan.
So, web hosting will cost you $35.40 (i.e. about ₦35,000) per year. (It used to be much less, but for the rising exchange rates).
The first year also includes free domain registration.
Note: This price is discounted for the first year. Hosting renews at $11.99 (i.e. about ₦12,000) a month. That will amount to $143.88 (i.e. about ₦144,000) from the second year.
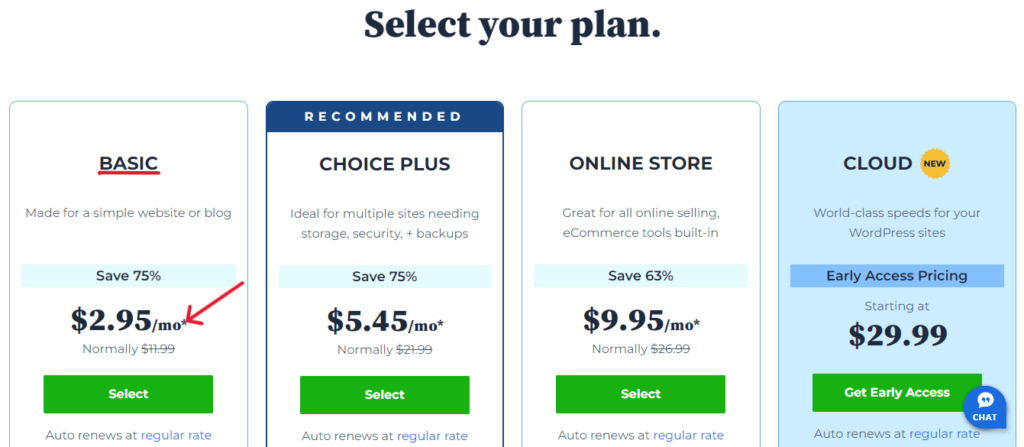
The best deal is the 3-year plan. It costs $4.95 (i.e. about ₦5,000) per month – a 50% discount for the first 36 months.

That’s a total cost of $178.20 (i.e. about ₦179,000) for 3 years.
Note: The 3-year plan renews at $9.99 (i.e. about ₦10,000) a month for another 36 months.
Select this hosting duration if you have the means for it because it will save you more money in the long run.
However, don’t overburden yourself; just choose what you can afford.
Another leading web hosting company that I highly recommend is Hostinger.

They offer 3 hosting plans: Premium, Business, and Cloud Startup.

Their Premium plan is a good starting point for a new blog.
It comes with a free domain for the first year, a free SSL certificate for life, up to 100 websites, and 100 GB SSD storage.
Other top features include weekly backups, free email, unlimited bandwidth, unlimited databases, and more.
Scroll down the Premium column to view all the features it offers.
Once you choose your preferred option, click the Add to Cart button to continue the purchase.
This will bring up the next page where you’ll select your preferred hosting period.
Every plan offers 4 different hosting period options − 1 month, 12 months, 24 months, and 48 months.

The 48-month plan is the best deal if you can afford it because you get to enjoy the discount for 4 years.
Hosting costs $2.99 (i.e. about ₦3,000) per month for the 48 months.
And hosting renews at the cheapest rate – $7.99 (i.e. about ₦8,000) monthly for another 4-year term.
So, the benefits of signing up for a longer term include enjoying the introductory offer for an extended period and renewing your hosting at a cheaper rate.
Having said that, again, choose what you can afford now.
Generally, all hosting plans on the most popular web hosts are risk-free. They usually have a robust return policy of a 30-day money-back guarantee.
So, you’ll receive a full refund of the hosting fees, should something go wrong, or if you are not satisfied within the first month with their services.
A blogging platform

Another essential tool you need to build and design your blog is a blogging platform.
It can be either a website builder or a content management system (CMS).
These tools are usually beginner-friendly, so no coding knowledge is required before you can use them.
Most of the functions you need to build a standard blog has been built into them.
So you can activate any feature you need with just a few clicks via an easy-to-use interface.
This helps you focus a lot more on creating great content that will bring in huge traffic and revenue.
I recommend WordPress.

WordPress is the largest and the most popular CMS in the world.
It currently powers more than 43% of the entire internet.
Here are some reasons why you should choose WordPress:
First, it is free and easy to use.
Second, you can get your blog online in mere minutes.
Third, you can use it to create a truly, one-of-a-kind self-hosted WordPress blog where you are fully in charge.
However, to use WordPress, you need to purchase web hosting.
Important: Beginners often confuse WordPress and WordPress.com, probably because they share the same domain name.
So, they end up creating a free WordPress.com blog only to realize later that they cannot achieve their goal on a free site.
But the two platforms are completely different.
WordPress (aka WordPress.org) is a content management system used for building and maintaining blogs and websites.
WordPress.com is a web host that provides homes for blogs and websites on the internet.
That said, a CMS cannot work alone. It must be installed on a web host before it can be used online.
Meanwhile, a web host cannot build a blog or website. A CMS (or website builder) has to be installed on it to create the site.
So, they need each other. A CMS needs a web host to function and host the site it creates, just as much as a web host needs a CMS to build sites for it to host.
Many web hosting companies (including WordPress.com) have preinstalled WordPress on their platforms to make it easy for users to build, host, and maintain their sites.
In addition to Bluehost and Hostinger I mentioned earlier, below are 3 other popular WordPress hosting providers:


What WordPress.com has done is offer free hosting (with limited features) alongside their premium plans.
It is simply a strategy to attract visitors to their platform.
Again, I recommend any of the above web hosts because they’re much cheaper compared to their WordPress.com equivalent − Business hosting, which costs $25 a month.
Please refer to my article: WordPress.org vs WordPress.com for more details.
Now you know the tools you’ll need to set up your blog, let’s look at the steps and process.
How to Start A Blog that Makes Money in 9 Steps
Step 1. Select a Hosting Plan and Register Your Domain Name, Or…
For this guide, I’ll be using Bluehost.

So, let’s head to Bluehost to sign up for web hosting.
Once on their page, click the golden Get Started button to view their hosting plans.

Again, I recommend you opt for their Shared hosting Basic plan.
It is just what you need to get started. The price is great, and the features are perfect for a new site.
You’ll get a 75% discount for web hosting for the 1-year term, or a 50% reduction for the 3-year option, whichever is convenient.
Then, click the blue Select button in the Basic column to continue.
This will take you to the next screen where you’ll choose your preferred option to set up your domain name.

First, you can use a domain you already own.
Second, you can register a new domain. This allows you to get a free domain for the first year, or
Third, you can choose your domain later.
Select the option you prefer, but like I said earlier, I’ll use the third option for this guide.
So, clicking on Choose domain later takes us to the Cart page where you’ll select your preferred hosting period.

3 options are available – 1 month, 1 year, and 3 years.
The 1-year and 3-year plans are discounted for the introductory term.
Again, the 3-year option is definitely the best deal in the long run. Because you will revert to the normal price only after 3 years.
However, most people start with the 1-year plan because they don’t want to overburden themselves financially.
So, don’t bite off more than you can chew. Hopefully, your blog will have started making money before the first year elapses.
That said, whatever option you choose, note that hosting will renew at the normal price at the end of the first term.
Next, delete other sections you don’t need now from the Cart. Once you do, the discounted cost will automatically reflect in the Order Summary column on the right.
Once satisfied with the total, click Continue to Checkout to go to the next page.
The next screen is the Checkout page. It has 4 sections:
The first is the Contact Information where you provide your personal details.
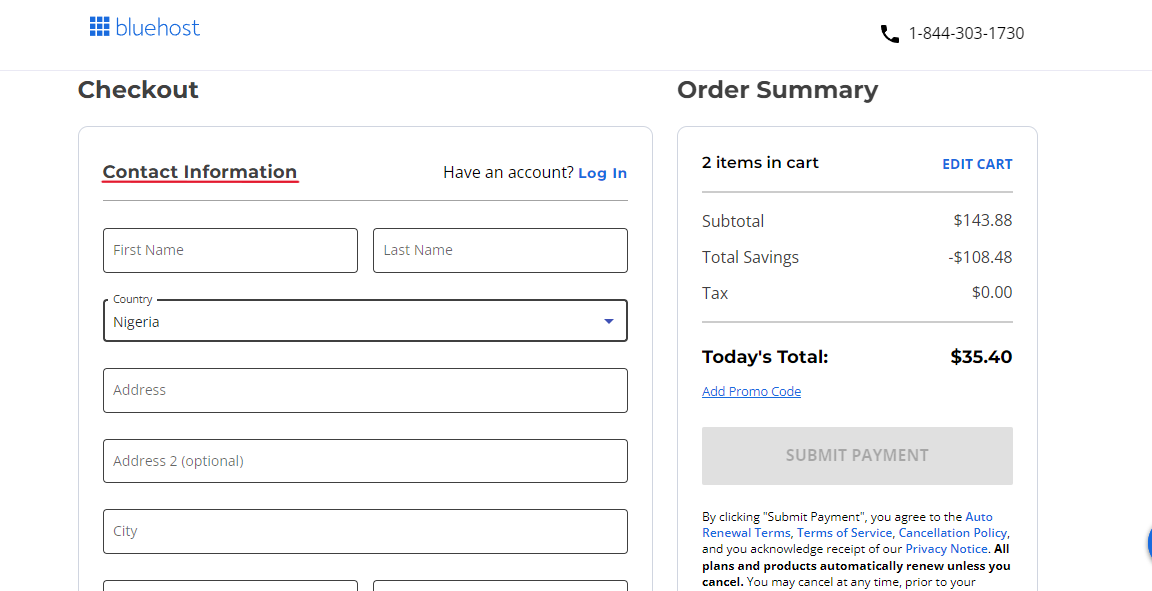
Make sure your data is accurate.
For the Postal Code column, the 36 states in Nigeria and the FCT each have their own code.
Check the Nigeria Post Codes list for your region’s code.
Also, make sure the email you provide is correct; your receipt will be sent to the address.
Next are the Account and Billing Information sections.

The Account Information section is where you’ll create and confirm your password. This is the password you’ll use to access your hosting account.
Choose a variety of characters to create a secure password to protect your site from hackers.
The Billing Information section is where you fill in your payment details. You can use either your credit card or PayPal account.
Again, make sure you enter your data correctly.
Next is the Billing Address section. By default, Bluehost uses your details in the Contact Information section here.
Finally, on this page, click on the blue Submit Payment button. And there you have it.
Once they confirm your payment, Bluehost will send you a congratulatory message to let you know your payment was successful.
They’ll also send your receipt to the email address you provided earlier.
Bluehost will then initiate the process of creating your account. This will take a few minutes to complete.
When it is ready, you can access it using the password you created earlier.
In your new hosting account, you’ll see a list of themes that Bluehost has chosen for you by default.
However, I’ll show you how to choose and install a WordPress theme for your blog; so click on Skip this step to go to the next stage of the building process.
Step 2. Install WordPress as Your Blogging Platform

In the past, installing WordPress involved a setup process in your Bluehost account, but not anymore.
Now Bluehost automatically installs the newest version of WordPress once they set up your hosting account.
Once they’re done, they’ll bring up a screen to let know WordPress is ready.
On this screen, click on the blue Start Building button. This will take you to the backend of your WordPress dashboard where you can start customizing it.
At this point, technically, your blog is live and functioning. Click the Start a WP Site tab at the top left corner, to view how your site looks.
It looks simple and plain. However, in the next few steps, we’ll work to improve and customize it.
But first, it makes sense to get familiar with your WordPress dashboard (or admin area), if this is your first blog setup.
You’ll be working mostly with the tabs in the left area (or sidebar) of your dashboard.

▸ Posts – Since you’re creating a blog, you’ll be spending a lot of time here writing your posts.
▸ Media – This is where you will manage the images and videos you want to use on your site.
▸ Pages – This is where you will create the few static pages such as About page, Contact page, etc. for your blog.
▸ Comments – This is where you’ll monitor your visitors’ comments in the Comment section of your posts.
▸ Appearance – This is where you’ll set up and customize your theme.
▸ Plugins – This is where you’ll install apps and features called plugins to extend the functionality of your blog.
▸ Users. This is where you can grant other people access to the backend of your dashboard.
▸ Settings – This is where you can make some basic customization to your blog.
Now, let’s customize a few critical settings. First on the list is your permalinks.
▪ Set up your permalink structure
This is also known as the URL (Universal Resource Locator) structure or simply Permalinks.
It defines the address (or URL) of each post, page, image, video, infographic, etc. on your site.
It helps users and search engines to understand what the content of a page is about.
So, choose an SEO-friendly permalink structure that is short and readable.
Thankfully, WordPress by default chooses the most SEO-friendly permalinks, the Post name option.
To view your site’s permalinks, click on Settings ≫ Permalinks on the left sidebar of your WordPress dashboard.
On the Permalink Settings screen, you’ll see the box of Post name already checked.

So, you may not need to make any changes.
▪ Set up your new homepage
This is also known as the static page.
By default, your posts’ titles will be displayed on your blog’s front page (which is great for blogs).
But you can still create a new page where they will appear, once you publish them.
To do so, you first need to create two new pages using the Pages menu in your WordPress dashboard.
You can then title the one that will serve as your new homepage Home and the other where all your posts will be listed Blog.
Click on Publish at the top of the edit screen of each page to make it live.
Next, click Settings ≫ Reading, and the radio button before A static page.
Now, select the new Home option you just created in the Homepage drop-down list, and Blog in the Posts page field.
You can title these pages any name you like.

Then choose whether you want full text or an excerpt of your posts to appear on the Blog page.
Finally, click the blue Save Changes button at the bottom of your screen, to effect the changes.
Customize your site title and tagline
Your site title is one of the first things people will see; so, you want to make it SEO-friendly.
WordPress by default displays your site as ‘Just another WordPress site’.
To change this, select Settings ≫ General, and enter your blog’s name in the Site Title box, and a short description of your site in the Tagline field.

Then scroll down and click the blue Save Changes to save your changes.
▪ Set up your navigation menus
Customizing your navigation bar enables visitors to easily find information on your blog.
Click on Appearance ≫ Menus in the left-sidebar, and under Menu Structure, type in the name of the new menu you want to create into the Menu Name field.

Then, click the blue Create Menu at the top to create it.
You can create as many menus as you want, and title each whatever you like.
Next, on the left under Pages, choose all the pages you want listed in your new menu. Then, click the Add to Menu button to add them.
Note: For your pages and posts to appear under the Pages section, they must first be live.
By the way, you can arrange them in your preferred order.
Then, click the blue Save Menu button on the bottom right corner to save your changes.
When done with these few basic settings, you’re ready to choose a beautiful design for your blog.
Step 3. Choose a Simple, Mobile-Friendly WordPress Theme
WordPress.org wants to give bloggers the opportunity to choose the look and feel of their blogs, so it ships every version of its software with simple, minimalist designs.
Each new default theme usually comes with style variations and templates that require a lot of enhancements.

However, there are ready-made free and premium themes available that you can easily customize to suit your style.
You want to choose a theme that can pull visitors in and give them a memorable user experience on your site.
More importantly, you want to pick a WordPress theme that is optimized for mobile.
Across the globe, statistics show that more people are viewing the web on their smartphones than on any other device.
The number is much higher in Nigeria – about 87% (according to Statcounter).
That’s why I recommend you select a simple, mobile-friendly theme with great – not too much – functionality.
Select Your Theme
By default, WordPress has handpicked a few free themes in your dashboard.
Simply click Appearance ≫ Themes in the side menu to view them on your screen.

However, you’ll want to look at more designs in the WordPress theme repository before you make your final choice.
Thousands of tested free and premium themes are available in the theme directory.
Simply click the Appearance ≫ Add New Theme to access about 12,000 free themes approved by WordPress.org.
You can search for free themes by clicking Popular, Latest, Commercial, Community, and Block Themes.

And if you have a general idea of what feel and look you want your blog to have, you can streamline your search with the Feature Filters tab.
For example, since you’re creating a blog, under Subject check the box before Blog. Then check the boxes under Features and Layout, for the feel and look you want.

Next, click on Apply Filters, and free themes that fit your specifications will appear on your screen.

You can use the Clear button to uncheck the boxes and repeat the process over and again to search for more themes.
If you know the name of the free theme you want, enter it into the Search themes bar at the top right-hand corner.
If you like a theme’s thumbnail, move your mouse over it to bring up a Preview button. Click on it to open it so that you can have a better view.
What you need is a simple, clean, lightweight theme that is close enough to what you want your blog to look like in terms of colors, layout, design, etc.
You can always improve on whatever you see.
Again, if you find a theme that fits your picture, move your mouse over it. The Install button will come on; click on it and wait for the theme to finish installing.
Once fully installed, an Activate button will replace the Install button.
You can either click on it to instantly activate the theme as your site’s active theme or, if you’re yet to make up your mind, click the Themes button on the sidebar to install it on your dashboard.
Again, move your mouse over it for Live Preview and then, the Activate button to come on.
If after taking a second look you like it, you can activate it as your blog’s new theme.
While there are many outstanding free themes, sometimes people opt for paid themes because of access to support from the creators themselves, just in case.
You can also browse a collection of approved premium themes in the WordPress Theme Directory. Simply click on Commercial Themes just above the search box.

Because of 24/7 support, you can pick one if you can afford it.
There are hundreds more in marketplaces like ThemeForest, MyThemeShop, Envato, and many others.
You should read my article on how to select the perfect theme before making your choice.
Premium themes can cost between $20 (about ₦20,000) and $75 (about ₦75,000), and in some cases, a one-time payment.
You can find pricier WordPress themes at StudioPress. They go for at least $130 (about ₦130,000).
Again, you don’t have to put yourself under any financial pressure.
So you can always start with a free theme, and as your blog grows, you can upgrade to a premium theme.
Whenever you purchase a premium theme, you first need to download it from the seller.
Then click Appearance ≫ Add New Theme ≫ Upload Theme to upload it to your WordPress dashboard.
You will be given a license key to activate it before you can use it.
Customize your theme
Once you activate your theme, you can tweak it to fit your taste and brand.
However, some free themes will allow you to make more changes than others.
Though these are basic customization, if you’ve selected a good theme, you should be able to make enough changes to make it truly unique.
You can customize your theme on its options panel, or with the WordPress Theme Customizer.
To access your theme’s customizer, go to Appearance ≫ Customize in your WordPress dashboard.
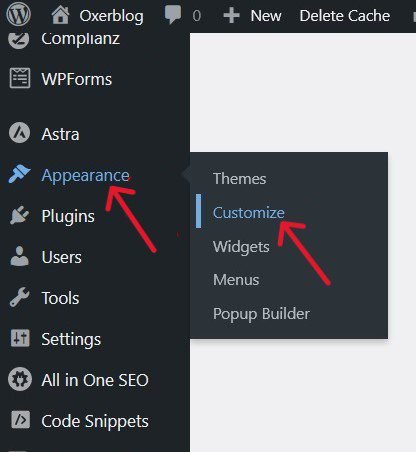
This will launch the customizer interface like the one below:

When you tweak any part of your theme, click on Publish at the top of the Customizer to save it.
Next, let’s move to the next step where you’ll be writing your first set of blog posts.
Creating content is the crux of your blog setup. And you’ll be creating two content types – pages and posts mostly.
Step 4. Create Solid, Useful and Relevant Posts
A blog’s content consists mainly of posts, so you’ll be writing a lot of them.
Posts typically are dynamic and timely content that appear chronologically when published, with the newest displayed on top so that readers can access easily the freshest post.
While it is important to create a site that’s well-designed, your posts will be the hub of your blog.
People won’t visit your blog just to admire its layouts, designs, and capabilities, but rather to read your content.
In fact, all the tools you use on your site are only useful if they improve user interaction with your posts.
Quality, helpful content is why people will return after their first visit. It is what turns visitors into users and, ultimately into fans.
I can’t over-emphasize this point.
Every step you take in creating your blog – from choosing a brandable domain name to picking a web host with 100% uptime rates, selecting a mobile-friendly theme, customizing your site with plugins, optimizing your content for better rankings, to promoting your blog – all boils down to one thing:
The right people visit your blog, return, again and again, to read your posts, and make use of your recommendations, products, and services.
Users and search engines will quickly recognize and define your blog by how relevant and useful your content is more than anything else.
If your content isn’t solid, relevant, and insightful, people will not return. Period! And this will affect your rankings.
Moreover, whether you’ll make money from your blog depends largely on the quality of your content, irrespective of the monetization strategies you use.
Again, people will be ready to stick with you and part with their hard-earned money only if your content continues to match their search intent.
That’s why blogging is a serious business – a very serious business; it is not a career for the fainthearted.
See what Google also says about creating quality content:
“Creating compelling and useful content will likely influence your website more than any other factor…Users know good content when they see it and will likely direct others to it. This could be through blog posts, social media, email, forums, or other means.
Organic or word-of-mouth buzz is what helps build your site’s reputation with both users and Google, and it rarely comes without quality content.”
Check it, high-quality content is at the heart of every successful blog.
You should, therefore, put more effort into creating quality blog posts and building a fully optimized site to help your readers easily access your content.
So you’ll need to roll up your sleeves from day one and start producing content that adds tremendous value to people, to keep them coming back for more.
▪ Find out what readers want
The first step to creating content that takes the guesswork out is finding out what your target audience wants to read.
How do you do that?
Simply identify the words and phrases that users are typing into search engines to find your kind of content.
These terms are known as search queries (or keywords).
So, the starting point is conducting keyword research. Find your users’ search terms and what they want to know about them.
In other words, you be searching for keywords and the intent behind the search queries.
For example, my target audience is beginners who want to build a business and career in blogging and make money online.
So, I’m focused on creating quality content that will rank in Google Search for terms relating to blogging and making money online.
▪ Write high-quality, satisfying content
If you’re just starting out, you’ll be pressured to churn out as many posts as possible and quickly go online.
But if you want higher search rankings, more backlinks, more social shares, and increased dwell time, you’ll need to get used to creating high-quality, well-written posts for their purpose.
Again, a blog consists mostly of posts. And generally, to write quality, satisfying blog posts, you need to do the following:
▪ Write quality long-form Posts
You’ll need to get used to writing genuinely helpful long-form posts of at least 2,000 words.
Take a look at the statistics:
A while ago, SerpIQ studied the content length of the top 10 results in different search queries.
They found that on average no. 1 result has 2,416 words and no. 10 result has 2,032.

Indeed, long-form content has been dominating for a long time.
Darren Rowse, CEO of Problogger, tracked the performance of his blog posts in search results.
As of 2013, he found that his long-form articles attracted more organic traffic from Google and got more social shares than his average posts.
He concluded that one quality long-form content was many times better than a series of short-form posts.
Quality trumped quantity then, and it still does today.
In another study, Moz teamed up with Buzzumo to analyze 1 million articles selected randomly.
One of their findings was that long-form content of over 1,000 words consistently receives more shares and links than shorter-form content.
Yet, they found that 85% of content published (excluding videos and quizzes) is less than 1,000 words.
According to them, people either ignore the data or for them, it is simply too much work to create quality long-form content.
Now, that’s a big opportunity right there.
One of the ways to quickly stand out is to write quality long-form posts.
According to Moz and Buzzumo, you’ll be way ahead of 85% of your competitors simply by writing extremely detailed long-form posts so readers can get most of the answers they want in one place.
That way, you’ll quickly become the go-to source in your niche for that topic.
Again, in 2019, Backlinko partnered with Buzzumo to analyze 912 million blog posts.
They found that content with 3,000 words gets more backlinks than content shorter than 1,000 words.

You’ve got to resist the temptation to want to quickly populate your blog.
Because one exhaustive long-form post will pull in more readers and rake in more money than tens of crappy short forms.
Having said all that, make sure your long form isn’t crappy either. Make every word count.
As John E. Lincoln said, your readers won’t appreciate a great deal of fluff in your article just to meet a word count.
However, creating a quality long-form piece takes time and effort, but it will be worth it in the end.
You’ll also want to make your long-form post appealing and easy to read by chunking your important points under related and necessary subheadings.
▪ Create an evergreen post
Generally, though posts have a short lifespan, evergreen content (aka cornerstone or pillar post) is content that is well-optimized for Search and remains relevant and useful for its purpose for a long time.
So its search volume is relatively high and does not dwindle with time. In other words, it doesn’t become outdated because it’s a timeless piece.
As Neil Patel said, evergreen content is centered around a topic that people are interested in for years to come.
Data show that evergreen posts usually attract and retain high traffic all year round.
Many times, they are the reason a healthy number of people begin an organic search.
According to Backlinko, “How-to” posts and “Lists” are the leading content formats for evergreen articles.

You should identify evergreen posts in your niche and be willing to put in the work required to create the best content in your industry.
I strongly recommend that your first set of blog posts should be pillar posts.
Because already, there is a big audience searching the web for such content all year round.
With a tool like Google Trends, you can easily discover topics with a relatively high search interest year-round.
For example, see the web search for how to start an online business.

And here are the regions where the searches are coming from:

In fact, you can compare as many as five topics to find out which one has the highest traffic.
So evergreen topics are low-hanging fruit that you should consider starting with.
That said, your content must tower above what is already available in Search, in quality and length, to stand a chance to rank on page 1.
Being an expert in your field can be a big advantage.
Because it is a big deal to Google when the information is from an expert, especially if you bring something new or different to the table.
They said in their SEO Starter Guide:

Like I said in the intro of this post, no niche is saturated. From Google, we know that most queries are open-ended.
In other words, they’ve not been fully answered.
So, as Google says, if you search the web and don’t find the answers you’re looking for, go ahead and create a detailed post about the subject. Most especially evergreen topics.
That is how I created 55 ways to make money online in Nigeria.
I just wasn’t satisfied with the answers that are ranking.
The post is about 30,000 solid words and it is the most authoritative and detailed article ever on the web on that topic.
Your long-form post will likely include diverse keywords which means it will attract diverse readers.
What’s more, with evergreen content, people don’t only view the post, they also click to read other articles on your site. That means a low bounce rate and higher rankings in search results.
▪ Write a data-driven post
Publishing data-driven posts is one of the most effective ways to quickly grow your blog.
Content backed up by relevant and reliable data stands out easily and makes an immediate impact.
It increases user engagement on your blog, generates more social shares, attracts more inbound links, prompts more click-through rates, and much more.
Data isn’t just numbers, it can also be other factual information like text, story, image, infographic, or web page about a survey, case study, experiment, or research.
Unlike in other places, not many posts are data-driven in this part of the world.
People are used to making assertions without trustworthy data to back them up.
While you may be talking from experience, backing your statements with factual data inspires trust and establishes you as an authority in your niche.
Again, Google rates the quality of your content by what it calls E-E-A-T: Experience, Expertise, Authoritativeness, and Trust.

Adding useful data from reliable sources to your posts is one of the ways you can boost your blog’s E-E-A-T.
This can inform search engines rating your content as high-quality, among other factors.
Thankfully, there are many authoritative data companies on the internet that you can scour for well-researched and accurate statistics.
Some of these websites are free, but you have to pay to access others. Examples include Statista and Datareportal.


Another common mistake I’ve noticed is people writing content for Nigeria, and backing their statements with numbers and data meant for the US, for example.
While some data can be used internationally, there are specific statistics for different regions that these data websites have published.
You can even carry out your own personal experiments (if you have the means) or partner with larger brands to conduct fresh research and report your findings in detail in your blog.
If the data isn’t yours, you should credit the right source.
It is a good practice to link back to the original source of the data using an anchor text within the paragraph (like I have done in many places in this guide).
▪ Focus one main topic per post
Again, your long-form post will probably have diverse keywords. However, the best practice is to have one lead keyword per piece of content.
In other words, you should focus on one main topic per post, while you want to touch on different aspects related to the subject, to help readers understand it better.
For example, this post you’re reading now focuses on starting a blog and making money from it.
However, I’ve touched on how to optimize your blog for SEO and how to promote it, because they are very relevant to the topic, though I have a full post on one of these topics.
I also dealt briefly with how you can monetize your blog. But I have an ultimate guide on how to make money online in Nigeria.
It is filled with factually accurate and relevant data from trusted sources. There is nothing like it on the web.
Google recommends that site owners should avoid having duplicate or near-duplicate versions of their content across their site.
For example, this post you’re reading now is different from how to create a new website in Nigeria, though the setup and tools needed to build a blog and a website are the same.
So basically, each post should address one main keyword, while you mention other supporting keywords where necessary.
If you have more information to share with readers for your supporting keywords, you can create a full post and make them the lead keyword.
▪ Use relevant images
According to research, articles with words and visuals attract 94% more views than those with text only.
So, consider adding relevant images, screenshots, illustrations, etc. to your blog posts.
This practice will achieve four things for you:
First, they’ll make your content more appealing.
Second, they will enhance your text, and help readers better understand your content – one picture, they say, is worth more than a thousand words.
Studies found that people remember 65% of text with one related image, while they only retain 10% without any accompany picture (Brain rules).
Third, using images will help break up your long-form content into bite-sized chunks of information. Experts recommend one picture every 350 to 400 words.
This will make your posts easier to read, and easy to remember.
Readers can also easily scan your content and zero in on sections of interest.
Fourth, your images can rank in Google Images and drive more traffic to your site. They can also be shared on social media platforms.
Having said all that, original, unique pictures do much better in Google rankings than stock photos (Reboot).

Because there’s a possibility users have seen the same stock images on a thousand and one other blogs.
Next, you need to optimize your images so they do not slow your site speed and push down your rankings.
Now, let’s write the first set of pillar posts you’ve identified.
I recommend you write between 3 and 6 posts before you go live.
With that said, let’s create your first post.
▪ Write your first blog post
Again, the Posts menu on the left sidebar of your admin area is from where you’ll be creating your blog posts.
You’ll be spending a lot of your time here because again, a blog’s content is made up of mostly posts; hence the name blog posts.
As I have clearly explained, some posts can be relevant and useful to readers for a long time, and can consistently drive traffic to your blog all year round.
Once you identify such content, go ahead and create them.
Include any and every factual information that will benefit your audience.
To write your first blog post, go to the admin dashboard and click on Posts ≫ Add New Post.

This will launch the post edit screen.

The latest WordPress editor, released in 2018, is block-based. So it is nicknamed the Block editor or Gutenberg editor.
It comes with dozens of unique blocks that you can use to create a beautiful layout for each item on your post (or page), from paragraphs to images, videos, widgets, lists, and many more.
Click the blue or black (+) button on your screen to select any of the 50+ blocks available.

You can start writing your post by typing your post title into the Add Title box.
To add content, move your cursor to the large white area below your headline, and begin to type your first paragraph.
There is already a block paragraph that you can use by default. But you can change it if you want.
Simply type (/) or click any of the (+) signs I showed you earlier to choose a different block.
To add images or videos, place your cursor where you want the image or video on your post, click the (+) button, and then select the Image or Video block.
Click Upload (to upload it from your computer), Media Library (to upload it from your site’s backend), or Insert from URL (to enter the URL).

You can access the Upload menu via your Media Library. Simply click Upload files ≫ Select Files on the next page.

Important: Title your images before uploading them directly to your post or Media Library using one of the supported image formats (recommended by Google).
Remember to also add Alternative text for each image in your Media Library. Then click Select to add it to your post.

An alternative text is a brief description (in less than 125 words) of an image.
You can also add the alternative text in the right column on the editor screen after adding the image to your post.
Next, scroll down and click on Advanced to add a short title for the image in the Title Attribute field.

If you want to change an image, use the Replace tab at the top of the editor.
You can add a caption or link (or both) to your image.
Tap on the image and click the Add caption menu at the top of your edit screen to bring up the Add caption and link icons.
If necessary, resize your images to what will display well on all screens.
If you’re not done writing, you can save your post as a draft by clicking the Save draft button.
Go over your draft and check for grammatical mistakes, spelling errors, typos, or ambiguous wording that may confuse readers. Simply click on the Preview button to do so.
You’ll find a tool like Grammarly very handy here.
Very importantly, you should properly optimize your content for SEO. I’ll show you how to in Step 6.
When you’re ready to go online, click on Publish and your new post will be live on the Web.
Congratulations! You have successfully launched your blog post and your blogging career.
Go ahead and create your other blog posts following the same process.
Step 5. Create the Critical Pages Your Blog Needs
From the get-go, your blog will need a couple of important pages for its smooth operation.
Pages are typically one-off, dateless content that can span the life of your blog.
They are completely different from posts.
Your posts deal with different subjects in your niche that you want users to understand better.
Your pages help them to understand and navigate your site better, and engage easily with your posts.
In other words, your posts give visitors more insight into your blog’s topic, while your pages give them insight into your blog’s vision and mission, and help them to quickly feel at home with your content.
Your blog should have the following important pages (which you should add from the outset).
Having these pages will make your blog look well organized and ready for business.
1. Custom homepage

WordPress will display a plain list of your latest posts on the default homepage.
However, you can easily select a custom page as your new homepage, if you choose to.
Your home (or root) page is the introductory page and gateway to your site.
So typically, this is the page that most visitors will first encounter on your blog.
There are two things you should know about your blog’s homepage:
First, visitors form an opinion about your blog in mere seconds.
So first impression matters. As the saying goes, “you never get a second chance to make a first impression.”
And second, great user experience on your homepage is key to your blogging success.
As such, you’ve got to make every second and word count if you want them to click on to explore your site.
So, you can design a simple, easy-to-use homepage with a brief introduction to your blog and clickable links to your most important pages and posts.
Most sites start with a bold caption (or heading), a tagline (or subheading), a nice picture of the blogger, or a beautiful image that captures your blog.
You can feature a few powerful reviews and testimonials once you receive positive remarks from users, popular bloggers, and high-ranking sites.
To summarize, a homepage is all about great user experience, so make it simple and user-friendly.
For example, take a look at my homepage.
2. About Page

The About page is one of the most visited pages on a site; so, your blog should have one.
Visitors want to know the person (or people) behind the blog, especially if they like what they’re reading.
Websites managed by a team call this page About Us, while those run by a single individual name theirs About Me (or simply About page).
Your About page should be a brief introduction of you (or your team), and not a biography.
What people want to know are simply the human face(s) behind the blog, their inspiration, and their experiences.
You should focus more on what your blog is all about, its goals, values, and what users stand to benefit from your site.
It also can include testimonials from reputable people online.
These ‘little’ pieces of information can quickly build trust and confidence in people, especially when they find it relatable, and this can prompt them to subscribe to your blog.
You want to also include clickable titles to your favorite posts.
For example, take a look at my About page.
3. Contact Page

Bloggers who don’t have a Contact page do themselves and their blog a great disservice, especially when their content is high-quality.
Because visitors, users, advertisers, potential business partners, other bloggers, etc. may want to reach you privately.
So, you may be losing a lot of money-making opportunities.
That’s why a Contact page is a must-have for every blogger who is serious about building a career and a business in blogging.
You can easily add a Contact page to your blog using a WordPress plugin like WPForms. It is what I used to create my Contact Form.
Though you can add as many fields as you want, these days, most bloggers only ask for names, emails, and messages or comments of their visitors.
The less personal information you ask of your users, the more comfortable they will be with filling out your form.
4. Privacy Policy Page

According to GDPR (General Data Protection Regulation), you’ll need a private policy page if you collect visitors’ personal data such as name, address, email, and if necessary, credit card details.
Your users will come from different parts of the world, so you need to comply, or you could face sanctions and heavy fines.
Moreover, a clearly written private policy page will show transparency and build trust among users everywhere.
Your private policy page should help them understand how you collect, store, and process the information you gather, and what measures are in place to protect their data.
People also have the right to know if you’ll be sharing or selling their data to third parties and why?
This page is also required if you’ll use third-party tools like Google Analytics and ad networks like Google AdSense on your blog.
Because these third-party services usually make use of cookies.
There are free and paid tools on the Web to generate a privacy policy page that you can customize.
You can view my Privacy Policy page to see how one looks.
5. Disclosure Page
Unless you don’t intend to monetize your blog, you should have a Disclosure page that explains to users the channels you’ll be making money from – for transparency’s sake.
Let’s say you’ll be making money through display advertising or affiliate programs, the common practice online is to let readers know that you’re using these channels.
Your Disclosure page should also inform users about some of the costs incurred in running your blog, especially if it is 100% free.
Let them know every product they buy through your referrals is at no extra cost to them.
Make an appeal to them to support you by using your links and telling others about your blog.
Take a look at my Disclosure page, for example.
6. Advertise Page
Digital display advertising is still a popular revenue source for bloggers in Nigeria.
In 2022, $81.08 million (i.e. about ₦55 billion) and $73.51 million (i.e. about ₦49.3 billion) were spent by advertisers on banner ads and video ads (Datareportal).

This rose to $108 million (i.e. about ₦100 billion) for video ads and $100.4 million (i.e. about ₦94 billion) for banner ads in 2023 (Datareportal).

Apart from displaying adverts through ad networks like Google AdSense, you can sell ad space directly to advertisers.
Create an Advertise page to let media buyers know you’re offering ad space on your blog.
This page should include details about the ad space, pricing, and your website’s data such as monthly page views, your readers’ demographics, etc.
Once your data is attractive, advertisers will want to contact you directly.
Remember to add a Contact form on this page so that whoever wants to reach you can do so easily.
7. Subscribe Page

If visitors love your content, they sure will be willing to subscribe for more.
While you can place your newsletter signup form at strategic points on your blog, it is usually more effective when you have a designated landing page.
That way, people can simply hit the ‘Subscribe’ button and sign up easily.
Moreover, when you create a ‘Subscribe’ page, you have a dedicated space to explain to users why they should subscribe.
If you have genuine testimonials from other subscribers, you’ll want to include them on this page.
To persuade people to join, you can offer an incentive like a free guide, content upgrade, or an e-book.
Also, if people know your newsletters won’t be spammy, it can encourage them to sign up.
8. “Custom 404” Page

A “custom 404” page (aka “404 error” or “page not found”) is a page that is designed to alert users that the URL they’re trying to visit is not available.
This error code could mean that the page has been deleted, broken, doesn’t exist, or an incorrect URL was entered.
It is quite normal for a site (especially new or small ones) to have a number of 404 errors per month. That said, you want to fix them asap.
Because when they become persistent, it creates a negative impression of your blog among users and search engines.
Too many 404 errors will create a poor user experience, increase your site’s bounce rate, and reduce pageviews. These, in turn, will push down your SEO rankings.
The best way to solve this issue is to create a simple, user-friendly custom 404 page that helps visitors easily locate alternative helpful content like your popular posts. This way, you’ll keep them on your site.
Now that you know some of the important pages your blog will need from kick-off, let’s learn how to create them.
As I said earlier when we familiarize ourselves with the WordPress dashboard in Step 2, your static pages will be created using the Pages menu on the side sidebar.
Let’s now create your first page.
▪ Create Your First Static Page
First, it is the same way you’ll create all your static pages (except in a few cases). And you can start with any page.
To create a page, click on Pages ≫ Add New Page on your dashboard.

This will bring up the page editor where you’ll be writing your pages.

It is quite similar to the post editor at first glance. But there are a few differences.
For example, the page screen doesn’t have sections like the Categories and Tags on the post screen.
Now, let’s go ahead and create your About page, for example.
On the page editor screen, type ‘About Me’ (if it’s only you) or About Us’ (if you have a team) in the title text box.

Now, move your cursor to the open space below your title and start to add your About content.
Just like your posts, you can add the block elements you need to create unique layouts for different items on the page.
To choose a new block, click on either the existing block, the Toggle block inserter (+) sign on the top left, or the Add block (+) at the right corner of your screen.
To add a photo or image to your post, position your cursor where you want to place it on the page and click the Add block (+) sign. Then, select the Image block.

Just like with posts, you can upload the image directly from your computer, select it from your Media Library, or enter its URL.
The image will instantly appear where you want it.
Once you’re done writing the page, click Save draft to save it, or Publish to make it live on your blog.
Let’s now see how to get your content (and site) ready for Google Search.
Note: Only your posts need to be optimized for Search, not your pages. Because only your posts will be competing for rankings on search results.
Step 6. Optimize Your Posts for Higher Rankings in Search Results
The number one place where you’ll find your target audience is in search engines, especially Google.
So you need to optimize your posts for higher rankings to get them in front of their eyes.
According to BrightEdge Research, 53% of all trackable website traffic comes from Organic Search.

But if your site doesn’t appear and rank high in search engine results, you cannot get that volume of traffic.
Page 2 isn’t an option; it is actually called a ‘graveyard’.
Because only 0.63% of Google searchers click on results on the second page (Backlinko).
With that said, no website or page ranks on page 1 by chance.
Thankfully, the ball isn’t in Google’s court, but yours.
There are calculated steps you can take to boost your chances of showing up on page one of search results.
The process is known as search engine optimization (SEO).

Even from its name, you can get the gist. It is simply making your content and website good enough to help them rank high on Google and other search engines.
The best ten results (according to Google’s standards based on signals from users’ activities and experiences on these websites) are the ones that are ranked on page 1.
Here are some basic SEO best practices (recommendations by Google), to help blogs and websites optimize for higher rankings.
18 Important SEO Techniques to Improve Your Rankings
On-Page SEO
On-page SEO is simply creating content that will wow your audience, and optimizing it so they can easily find your posts in search results.
This is how you do On-page SEO:
1. Find the Terms Your Readers are Searching For

The first thing is to find the words and phrases your audience is typing into Google’s search bar to find content like yours.
These words and phrases are called keywords (or search queries).
There are free tools that you can use to research these keywords. They include Google Suggest, Google Trends, Keyword Planner, and AnswerThePublic.
For instance, to use Google Suggest (or Autocomplete), simply begin to type in words into the search box, and Google will start to come up with suggestions.

These suggestions are the actual queries people are typing to search for content on Google.
Google Suggest is a great tool for finding medium- and long-tail keywords.
2. Crack the Intent Behind Each Query
It is extremely important that you find out what exactly people want to know about each keyword.
This is what is termed the search intent. What is the meaning of the keyword? What do searchers want to know about the keyword?
Sometimes, you can pinpoint what searchers are looking for when you understand the meaning of the keyword.
For example, Google gives examples of 3 different queries with the same keyword but different unique search intent.
▸ how to change a light bulb, i.e. replace.
▸ how to change foreign currency, i.e. exchange.
▸ how to change the brightness on a laptop, i.e. adjust.
Let me add two more:
▸ how to change the oil of your car, i.e. service.
▸ how to change buyers’ opinion about your product, i.e. influence.
Your ability to identify what users want to read is the crux of your online success.
3. Create Content that Satisfies Search Queries
Once you’ve found some keywords you understand the search intent, go ahead and write exhaustively about these keywords (according to the purpose of the page).
Now, it makes sense to target one main keyword per piece of content so that each post can rank for a specific term.
For example, this post you’re reading now is about how to start a blog and make money in Nigeria.
So, even though I mentioned how to monetize your blog in one of the steps, Google understands what it is mainly about.
I have written another article that targets the keyword how to make money online in Nigeria.
4. Add Your Keyword to Your Content

It is important to place your main keyword in strategic places in your content.
Because it is the most basic SEO signal that search engines look for in your content to match it with a user’s query.

So, starting from your headline to your introduction, to your subheadings, infuse your target keyword very cleverly and seamlessly.
However, don’t overdo it. Include it (say once) in the places I mentioned above. And a few times around your content where it makes sense.
First, keyword stuffing doesn’t make for pleasant reading; rather, it kills the flow. Second, you can get penalized for it.
To show Google you have a grasp of the topic, include variations and synonyms of your keywords moderately in your content when they fit.
This makes your content richer and helps both readers and search engines understand the subject better.
5. Write a Unique Title for Each Post
Your title is the headline of your blog post. It is the first SEO element in your post.
It is typically a short sentence of 60 characters at most that accurately describes the content of the post to Google and readers.
Search engines use it to identify and distinguish a post from other posts.
Your post title is not the same as your title link that appears in a search result.
That said, it can be a source for your title link if it is high-quality and communicates clearly the topic of the post’s content.
Thankfully, there’s nothing techincal you need to do to your titles.
By default, WordPress uses your titles as your title tags. So focus on writing good titles for your posts.
For instance, it is a good practice to include the main keyword for each post in its title.
And when you can, let your keyword be the first word of the title.
6. Write a Unique URL for Each Post
Like the title, the URL should also be specific to each post.
A URL is the individual address of each post and item such as an image, video, infographic, etc. on your site.
Search engines need a separate URL to find and index your posts and every item on your blog.
For example, the URL of this post is:
https://www.mydomainname/start-a-blog-and-make-money-in-nigeria/
No other post on my site has that URL.
A portion of your URL also appears as breadcrumbs (beneath your domain) in search results, to help users decide how relevant the post is to their search.
So use only words (including your target keyword) in your URLs that accurately describes the content, as in the above example.
7. Create Engaging Title Links for Your Posts
A title link is the clickable title of your result when it is served to a query in search engine results.
For example, here is how the title link for this post you are now reading will look like in search results:

This is what searchers will see on the search engine results page.
Again, people often confuse the title link with the page title (or title text), but they are not the same.
Your title link is what readers click in search results to view your content while your page title is usually the main heading of your post.
Again, Google uses several sources, including your title text, to determine your title link automatically.

According to Google, the goal of your title link is to best represent and describe your result in SERP.
So they will choose the text from any of these sources that effectively communicates the topic of your page’s content.
Again, 68% of online experiences begin in search engines. (BrightEdge).
That means the first experience people will have with your website is with your title links.
So, create high-quality content in those different places.
You can inform Google about your preference(s) if you have any.
8. Write a Very Rich Meta Description for Each Post
A meta description is a short summary of all the key elements of your post you want to highlight to both search engines and users.
While Google may not use it to rank your post, a description can prompt more clicks from visitors if it appears as snippets in search results.

So, make each meta description unique, and include every detail you want your audience to know about the post.
9. Use Header Tags to Structure Your Content

Use headings to break up your content (especially long-form posts) into bite-sized chunks so it is more appealing and easy to read.
Your heading tags should be meaningful and relevant to each section and the overall content.
The main heading, H1, should be the most distinct of all.
It should clearly reflect the content of the post and should include the lead keyword (just once).
For example, 55 ways to make money online in Nigeria. It should be 55, not 50 or 56.
Depending on the length of the post, you can chunk your content under subheadings H1 to H6, in whatever order you want.
So for instance, H5 can come under H2; it doesn’t have to be subservient to H4.
That said, use headings sparingly − only when necessary.
10. Add High-Quality Images to Your Posts
Adding quality images to your content can help your SEO.
We’ve discussed this under Step 5, but it is worth emphasizing again.
Original images do much better in search rankings than duplicate (or stock) pictures.
So as much as you can, create unique images for your content.
However, they should be relevant to the topic and sections where you place them in your content.
They should also be optimized for SEO so they don’t slow down your website’s loading speed.
Very importantly, each image should have an accurate filename and descriptive alternative text placed just outside the image (not directly on the image).
This is to help Google and visually-impaired users easily find and understand what the image is.
11. Connect Your Posts with Clickable Internal Links
Google strongly recommends that you link your related posts together with crawlable anchor text.

This will help users and search engines better understand the post you’re linking to, and navigate your site much more easily.
For example, if you click on this link − 27 simple SEO best practices, it takes you straight to that post.
So while you’re on my site, you don’t have to enter the URL of that post before you can view it.
I have included a clickable and visible anchor text to link to it because it is relevant to the post.
Also, use the appropriate text, so anyone can tell what the topic of the linked post is.
Just like from the text of our example, you can tell my post is about basic SEO best practices.
I have also formatted the link so my audience can distinguish it from other text.
12. Create External Links from Your Posts to Bigger Sites
Link your posts to relevant content on established websites, to help your readers learn more about the subject.

More importantly, search engines and users will begin to view your posts as authoritative.
For example, I have linked this post you’re reading now to several trusted sites most especially where I need to back up my statements with data.
And anywhere you see my external links, the anchor text is formatted, distinguishable, and clickable, just like my internal links.
Also, you can tell what the post or page I have linked to is all about from the anchor text.
Off-Page SEO
Off-page SEO is genuine links from other pages and websites that refer readers to your blog, mostly because of the quality and relevance of your content.
13. Get Organic Links from Credible Sites
External links from content on other websites to your blog posts are known as backlinks.

They are one of the 3 most important ranking signals, according to Google.

Search engines depend on quality backlinks to identify and rank quality content.
They believe that if other sites are linking to a blog post, it must mean that it is a trusted source of information on the topic.
So according to Ahref, the more backlinks a page has, the more organic traffic it gets from Google.
That said, only links from respected and related sites have value in the eyes of search engines, no matter how high the quality of your content is.
And quality backlinks are typically organic. In other words, they develop naturally and gradually, as people discover your content on SERPs.
To attract quality backlinks from authoritative sites, you need to consistently create high-quality and relevant content that people will want to link to.
Technical SEO
Technical SEO is making sure every part of your blog functions optimally so visitors (and search engines) have a good user experience.
14. Select the Most SEO-Friendly Permalink Structure
Your site’s permalink (or URL) structure is a basic SEO strategy that can greatly impact your blog’s success.
Because it defines the URL (or address) of each of your pages.
Again, WordPress automatically checks the Post name option because it is the most SEO-friendly permalink. And most blogs can use it out of the box.
We already saw how your post’s URL is one of the important on-page SEO elements.
And as I said earlier, visitors and search engines use it to understand your posts’ content.
So, choose a structure that search engines and humans can easily read URLs.
For example, https://www.yourdomainname.com/start-a-blog/
Compared to https://www.yourdomainname.com/?p=3216hppt/
These numbers cannot help users understand what the post is all about.
15. Set Up Google Search Console on Your Blog
Google Search Console is a free SEO tool that you need to set up on your site before launch.
Search Console has several amazing features that provide detailed analytics and reports about your site’s traffic and performance in Google Search.
So, you’re able to:
✓ Submit your sitemaps and new content for crawling
✓ Find out which pages have been crawled, indexed and served
✓ Analyze your posts’ positions and performance for your keywords
✓ Identify website errors and fix them
✓ And much more
With all this useful information, you can continue to improve your content for higher rankings in Google Search results.
16. Optimize Your Blog for Mobile

Everywhere, more searches originate from mobile devices than desktops and iPads (Statcounter).
Nigeria has 87+% of mobile searchers, one of the highest percentages in the world.
So, you will receive more mobile visitors to your site than any other group.
Moreover, with Google’s mobile-first indexing policy, you need to make your site mobile-friendly, if you want to rank high in search results.
17. Use HTTPS to Secure Your Site’s Connection

Hacks and cyber attacks are common occurrences on the Internet.
Hundreds of thousands of websites get hacked daily, and publishers’ and users’ data get stolen.
To prevent such an unpleasant experience, you want to secure your site’s connection with HTTPS from the first day.
First, it will boost visitors’ confidence and trust in your site. Second, it will improve your rankings.
18. Optimize Your Site Speed

Site speed plays a big part in the success of any blog. Because performance matters to users and search engines.
First, it can determine whether or not a visitor will stay to view your content.
Second, it can determine how Google ranks your site in search results.
Loading performance is another critical element of delivering a good page experience (one of Google’s important ranking factors).
So, when you’ve created great content, make sure your post loads and renders to a user’s query as fast as possible.
If your site loads fast, you’ll improve user experience, engage and retain visitors, increase conversion rates, and even save users some costs.
So, work on your site getting fast and staying fast from day one.
For more on optimizing your site for higher rankings, see my article on simple SEO best practices.
It covers 27 of the steps that Google says can help a new blog rank in search results.
The more of these recommendations you implement, the better your chances for higher rankings.
Now let’s add some essential features your blog will need to take off using WordPress plugins.
Step 7. Add a Couple of Essential Features With Plugins
We looked at how to set up some baseline settings on your blog after the WordPress software has been installed (in Step 2).
However, you can customize immeasurably more your site with software called plugins.
In fact, you can create a never-before-seen blog because of the sea of plugins available in WordPress.
There are currently about 60,000 free plugins in the WordPress plugin repository and thousands of paid plugins on the market.
These plugins enable you to add more functionality to your blog to improve user experience with your content.
Each plugin usually has a range of simple to advanced functions that you can choose from based on your needs at the time.
So because of these plugins, you don’t need to learn or use code to create your blog.
Having said that, you don’t have to install all the plugins for all the features you want to see on your blog from the outset.
Because installing too many plugins can adversely affect your site’s speed and performance.
Best practices:
✓ Install a plugin only when you need to add a specific feature to your website.
✓ Always start with the simplest feature of a plugin and as your site grows, you can upgrade.
✓ Start out with the free version (unless it is unavailable).
With that, below are the essential features to get your blog up and running, and the best free plugin to add each:
▸ A contact form to help your readers reach you easily – WPForms Lite
▸ Google Analytics to track your visitors’ activities on your site – MonsterInsights
▸ Drag and drop builder to create custom designs and pages such as your homepage design, landing pages, maintenance page, Coming soon page, etc. ‒ SeedProd
▸ Improve your site speed and performance – WP Super Cache
▸ Security and malware scanner to secure your blog – Sucuri Security
▸ Regular backups of your content – UpdraftPlus
▸ Optimize your blog’s SEO for better rankings – All in One SEO (AIOSEO)
▸ Email marketing to gather subscribers – HubSpot or ConstantContact
▸ Connect with every visitor after the first visit. – PushEngage
▸ Add social media buttons to encourage social shares – AddToAny
▸ Protect your site from unsolicited comments and spams – Akismet
▸ Set up a custom 404 error page to keep visitors on your site – Custom 404 Pro
▸ If you need to add an online store to sell physical products – WooCommerce
Let’s now see some legitimate ways to make money from your blog.
Step 8. Add Money-Making Opportunities to Your Blog
Blogging is a rewarding enterprise anywhere in the world.
Your blog can be a great success if you set it up well and use the right monetization methods. That said, it won’t happen overnight.
Guys you see as overnight successes have actually been working at it for quite a while.
If you too can make the extra effort to build a blog that satisfies your target audience over time, you’ll be rewarded for your hard work.
Next, bloggers make money through multiple channels at the same time. So, you are free to use different strategies at once.
However, find out what monetization methods leading blogs in your niche use to make money online.
Now, let’s see a few tested ways to monetize your blog in Nigeria, regardless of your industry.
1. Display Advertising

Most bloggers usually start out with display advertising to generate revenue.
They sell ad space in different places on their blogs such as header, footer, sidebar, and sometimes, in the middle of the posts.
The usual advertising formats include interactive (or clickable) banner ads, video ads, text ads, pop-ups, buttons, skyscraper ads, and rectangle ads.
And they come in different sizes.
Though there is a growing resentment for adverts shown on websites, display advertising is still popular.
In Nigeria, advertisers are still spending money on digital ads.
For instance, in 2023, $108 million (i.e. about ₦100 billion then) was spent on banner ads, and $100.4 million (i.e. about ₦94 billion) on video ads in Nigeria (Datareportal).
Ad space pricing is usually determined by advertising format, sizes, placement, and your blog’s traffic and popularity.
The summary is that when you’re just starting out, revenues from display ads can provide the motivation you need to press on with your blog.
With that, there are two popular ways to do display advertising:
Sell ads through ad networks
This is probably the simplest way to start making money with your blog in Nigeria.
Advertising network companies help bloggers to easily earn money by showing relevant ads on their blog posts.
They buy up unsold ad space from multiple sites, and sell them in bundles to advertisers.
So, they share the profits with you. They take about one-third and send you two-third.
Google AdSense remains the favorite and unarguably the best ad network.

No surprise though, because it is owned by Google, the biggest search engine in the world.
About 92% of online searchers use Google worldwide; 99%+ use it in Nigeria. So, it is a good place to start.
Once you’re eligible for AdSense, you can sign up with your Google (Gmail) account and start to earn.
Sell ad space directly
The second option is to sell ad space directly to media buyers yourself.
In other words, you could cut off ad networks and get a direct deal from advertisers.
This option is more profitable because you own 100% of the ad revenue.
That said, it requires a lot of effort and negotiating skills, to get some good deals.
You have a better chance of success when you have built steady traffic and a sizeable loyal fan base.
These are some of the numbers that will attract more advertisers and influence your pricing and bargaining power.
So by selling ads directly, you may get a better deal and more revenue.
You will need to create an Advertise page with all the details about the available ad space and pricing, plus your site data like monthly page views, your user demographics, etc.
I recommend you use a WordPress theme that is optimized for adverts if you want to display ads on your site.
2. Affiliate Marketing (AM)

Affiliate marketing is another way bloggers make money from their blogs, even in Nigeria.
It isn’t really new in Nigeria. It is very similar to the practice in the real estate industry where sellers and caretakers get paid a commission for a property they sell and rent out.
Many online loan apps also use this strategy in their business. They pay you a commission for each of your referrals.
Affiliate marketing is a common practice throughout the internet.
In fact, it is next to display advertising when listing the popular monetization strategies bloggers use everywhere.
So, though you’re in Nigeria, affiliate marketing has great prospects for your blog.
All you need to do is, recommend useful and relevant products and services to your audience, and earn a commission for each sale.
However, you want to promote only tested products and services to your precious audience, or you could lose them if you breach their trust.
Fortunately, there are great products and services in virtually every niche the audience needs.
So a new blog can very quickly begin to generate revenue through AM.
You’ll earn more money with this channel when you have a well-established audience.
Let’s say, for example, you get a commission of $5 (i.e. about ₦5,000) for every sale, and 20 people buy through you. That equals $100 (i.e. about ₦100,000) a month from one product.
This is a realistic estimate. And you can even make a lot more.
There are lots of international affiliate programs that you can sign up with, usually for free.
They allow bloggers from Nigeria to join their program and earn money in foreign currencies.
You can join different affiliate programs and promote multiple products your audience needs.
The easiest way to find the best products and services to market on your blog is to see what your competitors are promoting and enlist for the same affiliate programs.
3. Freelance Services

Offering freelance services to your readers is another sure way to make money from your blog.
It is much easier to market your expertise and skills if you already have a thriving blog.
In fact, apart from your audience, gigs will come from big organizations, both local and international, once they see what you can do on your website.
There is a great opportunity to make money if you’re knowledgeable about the topic and are good at content creation.
A freelance blogger, Bamidele Onibalusi, a young Nigerian, earns a six-figure income yearly from his blogging business.

He started his blog, Writers in Charge, over a decade ago as a teenager to showcase his writing skills.
His blog has attracted millions of readers, and tens of thousands of people are subscribers to his newsletters.
He now creates content for dozens of businesses around the world and teaches others how to become successful freelance writers.
He said he has been pulling in six figures monthly for the last 10 years.
You don’t need to pull a lot of traffic like Bamidele before you can start making money.
You just need to create quality content that attracts visitors and you can get a couple of freelance gigs.
Also, so many businesses in different niches now have a blog section on their websites and are looking for good freelance writers to hire.
If you’re thinking of freelancing, let people know who you are and what you do.
In addition to creating content on your site, you could also guest post on established blogs in your niche. These posts will also serve as samples of your work.
You’ll want to create a Media Kit page on your blog to advertise your skills and services pricing.
You could charge your prospective clients on an hourly basis or per project, depending on the task at hand.
4. Sponsored Blog Posts/Reviews

Publishing sponsored (or branded) blog posts and reviews is another way to generate revenue for your blog.
Again, you stand a better chance when your blog has a reasonable audience size.
Related companies and businesses will be willing to pay you to advertise their products and services to your audience in your sponsored posts and reviews.
For sponsored posts, you’ll be publishing content written by either you or the marketer, while for reviews, you’ll be giving your sincere opinion and feedback about a product or service after testing it.
However, you shouldn’t mortgage your audience’s trust for money. You don’t want to damage your reputation for a few bucks.
Like we say in this part of the world, the money will ‘finish’, but the hurt and distrust could last a lifetime.
Like freelancing writing, create a Media Kit page to let prospective advertisers know you sell branded posts and do reviews on your blog.
Also, tell them why they should invest in your platform.
5. Online Courses

Selling an online course is another flourishing monetization strategy, regardless of your niche.
Globally, the demand for online courses is soaring because of how practical and convenient they are generally.
For example, Bamidele Onibalusi doesn’t only make money through creating content for businesses, he also has a thriving online course for freelance writers.
Just like Bamidele, you can create a course on your expertise and experience and sell it online.
If you’re good at what you do, and your course outline is robust, interesting, and beneficial to your audience, they will be willing to pay for it.
For highly specialized courses, you need formal training and certification before you can teach them.
For less sensitive courses, your first-hand experience and knowledge about the subject is enough for you to be regarded as an expert in the field.
However, you can create a course on just about any subject that people want to learn.
Having said all that, you need good packaging and presentation skills to succeed as an online course creator and tutor.
To choose your course topic, write down a list of topics you have expertise in and type your ideas into Google Trends, to find the web search interest.
Once you’re ready, there are so many good course creation platforms that you can use to easily create your online course.
6. Physical Products

Selling physical products to your audience is an excellent way to monetize your blog.
As a matter of fact, it is a major monetization strategy in blogging.
Most blogs either have an online store to sell their products, an affiliate shop to sell other people’s goods, or simply run a dropshipping business.
Any of these options will work well once you have an engaged audience. Because there’s a good chance they’ll appreciate the products you offer.
You should interact with them, understand their challenges, needs, etc., and create or source quality products that can help them solve those problems, while you make money in the process.
Some bloggers also list their wares on eCommerce marketplaces to establish a presence there, to appeal to a wider customer base.
7. Digital Products
If you think the logistics of managing inventory are pretty complex, you may want to try digital goods instead.
Many blogs prefer to offer intangible products like themes, templates, plugins, ebooks, audiobooks, or other downloads that their audience needs.
Compared to physical products, digital goods are low-risk investments with low overhead.
They can be produced and delivered virtually, so you don’t need to manage inventory.
Also, you scarcely have to worry about expiry dates, and you can easily upgrade any time to improve their functionality and relevance.
Like physical goods, you can sell digital products in your online store and list them on eCommerce marketplaces, to make more sales.
Your profit margin will be bigger if you’re the one who makes the products yourself.
You can also start an affiliate program and encourage your audience to become affiliates.
Note: If your audience needs them and you have the capacity, you can offer both digital and physical goods in your online store.
For both physical and digital goods, there is no limit to how much you can make.
You only need the right products, a decent-sized customer base, and effective marketing strategies.
8. Coaching Services

Coaching is yet another viable way to make money with your blog.
The demand for coaching services is growing fast.
People are dealing with very personal issues that are affecting their overall productivity.
Apart from reading your resource materials on your blog, people would still long for personal one-on-one coaching sessions.
Because it seems as though it is difficult for some individuals to self-motivate.
So offering a coaching service to your audience can be an additional revenue source for your blog.
People are ready to pay to get motivated to become better people so they can reach their goals.
You should consider coaching if you have the skills and experience to help people in their personal lives, relationships, business, teamwork, health, career, parenting, or any other area.
Coaching is also needed in more specific areas like public speaking, writing, dieting, self-confidence, romance, weight loss, you name it.
Making money as a coach is much easier when become established in your niche.
As your blog grows, you should be taking notes of the things that are making you better.
These experiences can form part of the crux of your coaching skills.
Added to the one-on-one sessions, you should create self-guided teaching materials such as videos, downloadable ebooks, audio files, etc. that your clients can use at their own pace.
You can also create a Coaching page on your blog to advertise your services.
9. Consulting Services

While coaching is about helping people become better, consulting focuses on helping businesses improve.
As a consultant, companies in your niche will want to hire you to help them up their game as well as oversee some specialized projects.
The job of a consultant basically is to use their expertise to point out snags in a company’s operations and get them unstuck with a unique strategy, so they can make progress again.
Your blog provides the platform to show your skills and experience in your area of expertise.
Once companies see that you know stuff, they will want to hire you.
If you’re interested in consulting, you want to create a Consulting page to advertise that you offer such services.
It should include a booking form that prospective clients can use to reach you easily.
10. Paid Membership

Paid membership subscriptions are another way to generate revenue, if you consistently publish high-value content on your blog.
If you have an active readership who wants to read more about what you write, then you can create an exclusive area that only paying members can access.
To attract a premium, this members-only area should include not just the best you have to offer, but what people cannot get for free or for less, somewhere else.
It could be a combination of some of the following perks: more in-depth content, a community area, bonus learning resources, extra services, premium tools, and special videos.
Once they taste your good stuff, readers will be willing to pay a monthly or yearly subscription to become a member.
Though it is taxing to constantly create premium content for your subscribers, it is very rewarding because you’re assured of recurring revenues.
Again,only use the channels that are most effective in your niche.
Let’s now see some popular ways to get your blog in front of the right audience.
Step 9. Promote Your Blog to Your Target Audience
Today, nearly 2 billion websites are on the Web, and approximately 6 million blog posts are published daily (Internet Live Stats).
So, if you go online without time-tested promotional techniques to give your blog a cutting edge, your site (and content) may be buried away in the sea of websites and blog posts.
Moreover, according to GrowthBadger, bloggers who actively promote their blogs earn more money compared to those who don’t.
There are lots and lots of ways to promote your blog today.
However, you’ve got to cut through the noise and focus on activities and strategies that will help your brand reach your target audience faster and more effectively.
Below is a list of proven promotional tactics every new blog should try.
With these strategies, you can quickly build a community of loyal followers around your blog.
1. Look for Guest Posting Opportunities

Guest posting is a great idea for growing your new blog.
There are two ways to find guest posting opportunities.
First, some blogs are actually looking for new guest authors. They usually have a Write for Us page where they advertise and state their guidelines.
So, look for such opportunities in your niche.
The second way is to reach out to successful bloggers in your niche and make a pitch to guest post on their blog.
This is a type of blogger outreach.
However, these opportunities do not happen overnight. You first need to connect with these bloggers.
You can start by writing genuinely positive comments on their blog posts to get on their radar.
Once they warm up to you by responding to your comments, you can then approach them.
Contact them through a personalized email message and tell them of your intentions.
A number of them will reply you if they find a sample of your content helpful.
When Bamidele Onibalusi started blogging in April 2010, he guest-posted on big websites to get some exposure.
By December 2010, he claimed he had written 270 guest posts, and was attracting 9,000 monthly unique visitors to his blog.
While you don’t have to write that number of posts, guest posting is a great way to grow your blog.
This strategy works better if you include an offer that can prompt people to visit your blog, when you eventually get an opportunity.
For example, you could create a special bonus content on your blog for your guest post readers alone.
To accept guest posts from other people, create a blog post-submission form on your site using a plugin like WPForms.
2. Reply to Every Constructive Comments

One of the strengths of blogging is the comments section on your blog posts.
It is a great channel for interacting with readers. However, many blogs do not take advantage of the opportunity.
More importantly, make people count by replying to their comments. It is common courtesy. A simple ‘thank you’ to a comment appreciating your post means a lot.
You know how it feels when you comment on someone’s post and they reply to you. You feel you matter, and your contribution makes sense.
That’s the same way your commenters feel when you respond to their comments. Your reply makes people feel very welcome.
But when you say nothing to a person’s comment, you’re simply telling them that they’re not welcome in your community.
Silence speaks volumes to people. There is a saying that “silence is the best answer for a fool”.
When you say nothing, you’re simply saying ‘No comment’, and that says a lot to them.
People may not want to comment on any of your posts again. Worse still, they may go somewhere else where they are friendly.
Some visitors write comments because they need help. They may ask questions about something that isn’t clear to them in your post.
Though replying comments takes time and effort, it is worth it.
Having said all that, you’ve got to have thick skin when it comes to derogatory comments. You don’t want to waste your time answering such.
3. Start Building an Email List

Despite the numerous new ways of communicating today, ‘old’ email is waxing stronger.
An average of 11.84 billion emails are sent globally every hour as of 2021 (Internet Live Stats).
Emails remain the best channel to effectively engage your visitors, especially those who fall in love with your content.
Think about it, it doesn’t matter where in the world, emails are widely used to transact business electronically.
They are needed for sign-ups, purchases, communication between businesses and customers, etc.
So, for your blogging business, set up a strategy to build your email list very early so that once people visit your blog, you can get their emails.
When a visitor subscribes to your email list, start cultivating a relationship with them through simple newsletters.
This group of people who sign up for your emails is an invaluable asset to your blog.
More importantly, they become your blog’s precious mouthpieces, helping to expand its reach, online and offline.
They tell others about your new content and product and provide you valuable feedback from their circle.
Again, keep your newsletters simple – both design and message.
Thankfully, there are free email marketing tools like HubSpot, Sender, and Brevo that you can use to set up one.
4. Leverage Social Media Networking

Promoting your blog on social networks is one of the best ways to create awareness among your target audience and drive traffic to your new site.
In 2023, 27.3% of Nigeria’s social media users used social media to find content such as articles (Datareportal).

However, your social media posts need to be highly engaging to prompt people to click through to read your blog posts.
Take a look at Datareportal’s statistics on web traffic referrals from social media to blogs and websites in Nigeria in 2023:

So leverage social media networking to build an engaged following for your blog.
Create an account on every popular social media platform where you can find your target audience.
It is free and easy to create accounts on popular social networks and to post content on them.
Remember to include social media sharing buttons at the header and footer of your blog posts.
You can easily do this with a good WordPress social share plugin like Social Snap and Social Warfare.
5. Reach Out to Influencer Bloggers

Reaching out to influencer bloggers in your niche is another type of blogger outreach.
This is similar to guest blogging, only that you’re not reaching out for a guest post pitch but to ask them to share your content with their audience.
First, find the big-name blogs in your space, starting from page 1 on Google Search.
You’ll be looking for bloggers who are likely to accept and share your posts.
These guys are already sharing content on your topic.
Once you find them, try connecting with them.
Just as with guest posting, follow them on all the social media platforms they’re active on, and leave positive, helpful comments about their stuff on social media and their blog posts, to get on their radar.
You can also share their content a number of times on your social media posts.
Then, write them a personalized outreach email or through their blog’s Contact form.
However, make your content highly engaging and shareable – the kind bloggers will be excited to share.
Frequently Asked Questions (FAQs)
Here are some common questions on how to start a blog that you may find helpful.
How can I become a blogger in Nigeria?
To give a robust answer to this question, we should first define who a blogger is, and what they do.
A blogger is simply a person who constantly writes useful, original content on a blog, either full-time or part-time.
He may be the site owner, an employee, or a volunteer (or guest blogger).
Unlike in the past when it was more of a hobby, blogging today is about sharing knowledge and generating revenues – at least for most bloggers.
So, the hobby part has been replaced by serious writing.
Now, a blogger chooses an area that suits his skills, expertise, or experience, and then creates relevant content on a regular basis to help users in that niche.
So, blogging is a profession today. Many people, across the globe, have built successful online businesses and careers in blogging.
To become a blogger in Nigeria, you must first find the perfect blog niche that matches your skillset.
Then, start a blog (or join an existing website) and create helpful posts for your audience. And if you choose to, you can make money from your content.
Where can I learn blogging in Nigeria?
You don’t need to spend money on formal training to learn blogging in Nigeria, or anywhere else.
There are many free resource sites for beginners where you can learn the A to Z of blogging – from starting your blog to monetizing your site, growing your traffic, and much more.
They have been written by some of the best minds in the world.
This is what oxerblog.com is all about.
I work hard to provide detailed, user-friendly, 100% free tutorials, tips, strategies, etc. to help beginners master the basics of blogging so they can launch their careers and business successfully.
So, you can learn how to blog from the comforts of your home.
However, like anything else, you need to be an avid reader with great discipline and commitment to learn on your own.
How do I start a blog for free?
It is quite easy to get started.
Simply sign up on any hosting platform that offers free hosting and create your free blog. Examples are WordPress.com, Bloggers.com, and many others.
However, you only want to start a free blog if you don’t intend to start a career and business in blogging.
Because you practically have no say in a free blog – from its setup to its running to monetization.
The guys offering you their platform for free call the shots on your site.
They offer you a tiny space to start a free blog, but they are not doing for nothing.
It costs them lots of money to build and maintain their platform.
Their strategy is to offer you (and others) free hosting and make money from your content through display advertising so they can continue to run.
That’s why the alternative is much better.
You only need to make a small investment in web hosting. And that puts you in complete control.
All the other tools you need to get started are totally free.
So, for all your hard work and time, why not pay for web hosting and monetize your blog yourself?
You’ll be amazed at how much you can rake in with time.
It will cost you roughly $3 (about ₦3,000) a month to start a blog. However, you’ll need to pay for at least a year.
If your content is original, helpful, and well-optimized for SEO, you can begin to rank high in search results very quickly where you can attract the right people to your site.
And if you have included ways to generate revenue for your blog, you can then start to make money.
And you just can’t tell how big your ‘small’ investment will grow to become.
You should see my article on WordPress.org vs WordPress.com − which is the better choice?
If you ask me, I’d say “Go for it!” Trust me, it will be totally worth it.
Just follow this guide − how to start a blog and make money in Nigeria, to get started.
Is blogging profitable in Nigeria?
Definitely, it is!
Blogging is a profitable business in Nigeria – if you put in work.
People who are succeeding at blogging are doing so because they invest time, money, and effort, over time, doing the right mix of things to build a thriving blog.
On the other hand, thousands of bloggers are making little or nothing from their blogs simply because they’ve not made them profitable.
It doesn’t matter where you live on the planet, if you follow practical tips on how to make your blog profitable, you too will make money.
Simply follow the right tips on ‘blog niche’, ‘web hosting’, ‘domain name’, ‘blogging platform’, ‘responsive theme’, ‘content creation’, ‘SEO’, ‘monetization methods’, and ‘site promotion’.
All of these are geared toward attracting more traffic and gathering dedicated followers.
These people, hopefully, will use your content, products, services, recommendations, etc., while you make money. And as your users increase, so will your revenue.
Successful bloggers in Nigeria, and across the world, have built profitable blogs in different niches using these same tips.
The more good tips you implement, the more your blog flourishes.
What you need to succeed is dedication and commitment – there are no shortcuts to enduring success.
Thankfully, you don’t have to know anybody at Google, or any other search engine to succeed at blogging.
So anyone, irrespective of who they are, can build a very successful blog once you follow the right path.
How much does it cost to start a blog in Nigeria?
The basic startup costs are the same for all types of blogs everywhere.
That said, the final cost will depend on the features you add to it.
Now, to start a blog on a low-budget blog in Nigeria, the only startup cost involved is the web hosting fees. And you want to buy from a dependable web host.
So for a one-year term, it can cost anywhere between ₦24,000 and ₦60,000 to start a new blog in Nigeria, depending on the hosting company.
I recommend Bluehost or Hostinger because they have affordable hosting plans for beginners.
More importantly, they have an impressive track record of hosting new blogs successfully.
It costs just $2.95 (i.e. nearly ₦3,000) a month for the cheapest hosting plan on Bluehost, and it’s billed annually.
However, take note hosting will renew at $11.99 (i.e. about ₦12,000) a month for the 2nd year.
So, starting a simple blog costs about $35.40 (i.e. roughly ₦36,000) a year on Bluehost.
The package includes a one-year free custom domain, free SSL certificate for the first year, and 24/7 customer support, among other benefits.
If you choose Hostinger, their cheapest hosting plan costs $2.99 (i.e. about ₦3,000).
So it will cost you about ₦36,000 for one year. However, it comes with an extra 2 months of free hosting.
Hosting will, however, renew at $9.99 (i.e. about ₦10,000).
You can start out with a free theme and free plugins from WordPress.org.
When your blog starts to gain traction and generate income, you can upgrade to a premium theme and paid plugins, based on your needs.
My article titled “What is the cost of building a new website?” will be of tremendous help.
How much do bloggers earn in Nigeria?
Some bloggers make ₦0 monthly, while others rake in millions of naira.
Among other things, it all depends on several variables such as:
✓ Your blogging niche – some niches are more popular and profitable than others.
✓ The relevance and usefulness of your content – this helps build your site’s authority and determines your loyal fan base
✓ Your understanding [and use] of search engine optimization (SEO) – this can influence your search rankings and traffic.
✓ Your promotional strategies – how you are able to proactively reach your audience to grow your blog.
✓ Your revenue models – how many monetization methods you use and how effective they are.
Generally, you might not make anything in the first few months of blogging. That’s normal with any business endeavor, whether online or offline.
But as you continue to work hard, things will pick up, say between the sixth month and the first year. It could be earlier or later.
And as your blog gathers steam, your income will also increase.
With that said, what you don’t want to do is skimp on what it takes to build a great blog.
When you do things right, you will continue to reap the benefits for years.
How can I start a personal blog in Nigeria?
You can start a personal blog by following the steps below:
Step 1. Choose a solid niche where you can achieve outstanding success
Step 2. Sign up for web hosting and register your domain name
Step 3. Install your blogging platform – WordPress
Step 4. Pick a theme that fits your style and goals
Step 5. Install plugins to create a truly unique blog
Step 6. Write your first set of blog posts
Step 7. Optimize your content for SEO
Step 8. Let your target audience know your blog is ready
How do Nigerian bloggers make money?
Bloggers make money from their blogs using the following monetization channels:
✓ Display ads
✓ Affiliate marketing
✓ Freelance services
✓ Sponsored posts/reviews
✓ Coaching services
✓ Online courses
✓ Consulting services
✓ Physical/digital products
I explained each of these revenue models in Step 8 of this guide.
Conclusion
In Nigeria, the choices of career paths and business opportunities in blogging are becoming greater by the day, just like in other parts of the world.
More and more people are becoming successful online as full-time bloggers in different niches, whether popular or new.
You too can pursue a career path in a blogging niche that matches your skillsets and interests.
Use this guide to start a functioning and well-optimized blog.
Then, take advantage of the opportunities in your niche to start your business – write ebooks, create online courses, offer coaching or consulting services, sell products, etc.
And who knows, you might just be the next big thing online!
And there you have it – how to start a blog and make money in Nigeria.
I hope this guide helped you learn how to start a blog and build a successful business and career as a blogger in Nigeria.
You should see my article on choosing the perfect blog niche before you pick yours. It will guide you to make the right choice.
I also recommend you read my post on developing a robust SEO strategy.
It is a must-read if you want to learn how to create content that people love to read and Google loves to rank.
You may also want to see the most exhaustive article on making money online in Nigeria.
It includes 55 practical and current ways of making money online. There is nothing else quite like it.
If you like this article, please help me spread the word among your friends. Thank you!